
How to Create an AWS Site-to-Site VPN Connection Part Two: Network Architecture
In part two, we'll talk about the AWS Network Architecture, and how basic network configurations work to ensure connectivity.


Heeeyyy fahm!!!! This is Part Two of our Site-to-Site VPN Connection!!! 💃💃

Now for those just joining in, here's Part One of our series;
Now for this part sadly it's not hands-on, I just thought of briefly introducing some of the concepts we'll be using for our connection, and also how everything works so one can understand how the AWS Network Architecture is structured.
We'll talk about
Subnets
Security Groups
Network Access Control Lists (NACLs)
Route Tables; Internet Gateways, NAT Gateways
Elastic Network Interfaces (ENIs)
So buckle up for this lecture!!!

1. SUBNETS
Now when we talk about subnets, I want you to take a look around your house. There's a kitchen, bedroom, sitting room, and washroom, yeah! (For my champions living in bedsitters, single rooms, this one's not for you! 🤣🤣🤣🤣)
Each room has its designated function. That's just how subnets work; an isolated environment to launch specific resources for doing specific tasks. It makes the management of resources easier!!!
Just imagine if everything was clamped in one room! It'd be chaotic!!! (bedsitter, single room left the group 🤣🤣🤣 ) So subnets help in the organization of resources.
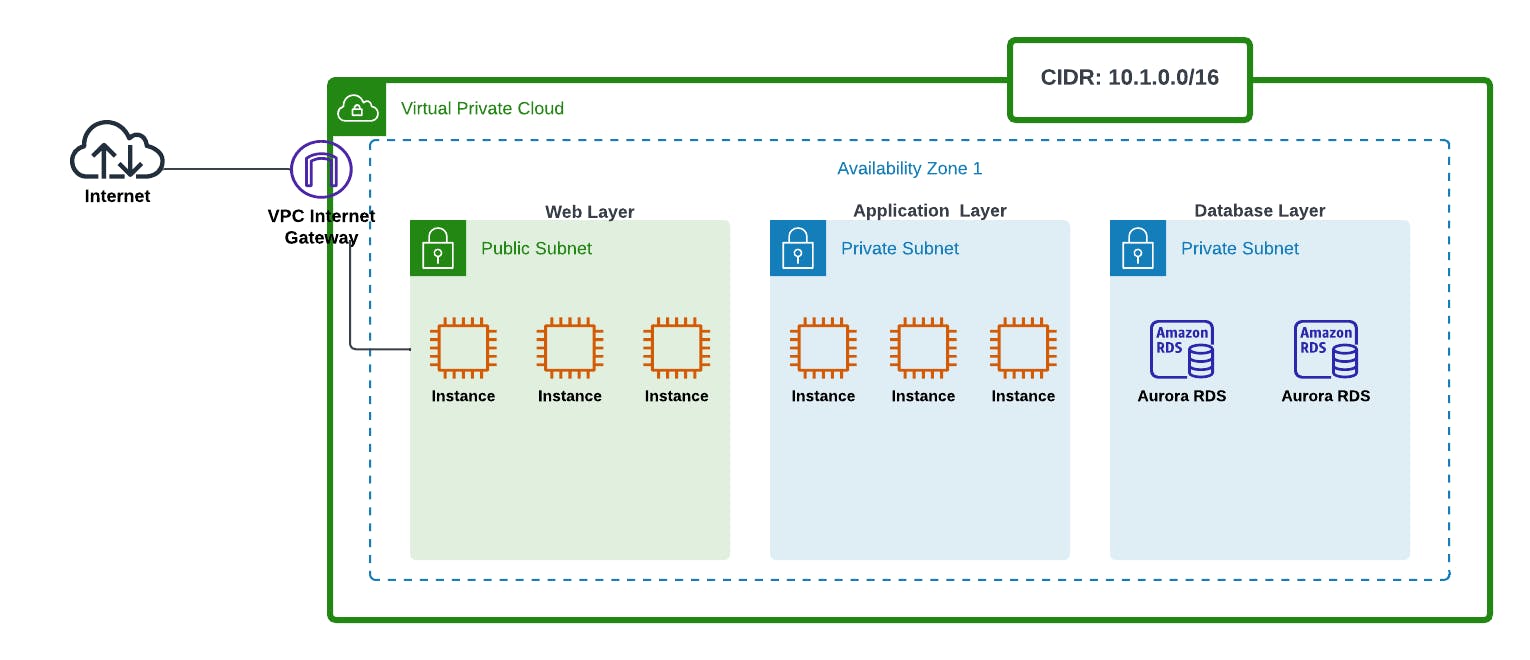
Here, we have a simple 3-tier architecture for an application.
Public Subnet 1: Web layer having web servers.
Private Subnet 2: Application layer having our compute instances.
Private Subnet 3: Database layer having Aurora Database instances.
Okay so now imagine we have our application running smoothly, everything set, but we've deployed all our resources in one Availability Zone. Then boom! Floods happen and that Availability Zone gets swept away!!

It is therefore good practice to span your workload in different Availability Zones so that just in case one of the Availability Zones catches fire, or is affected by floods, you don't get affected. This is demonstrated below.
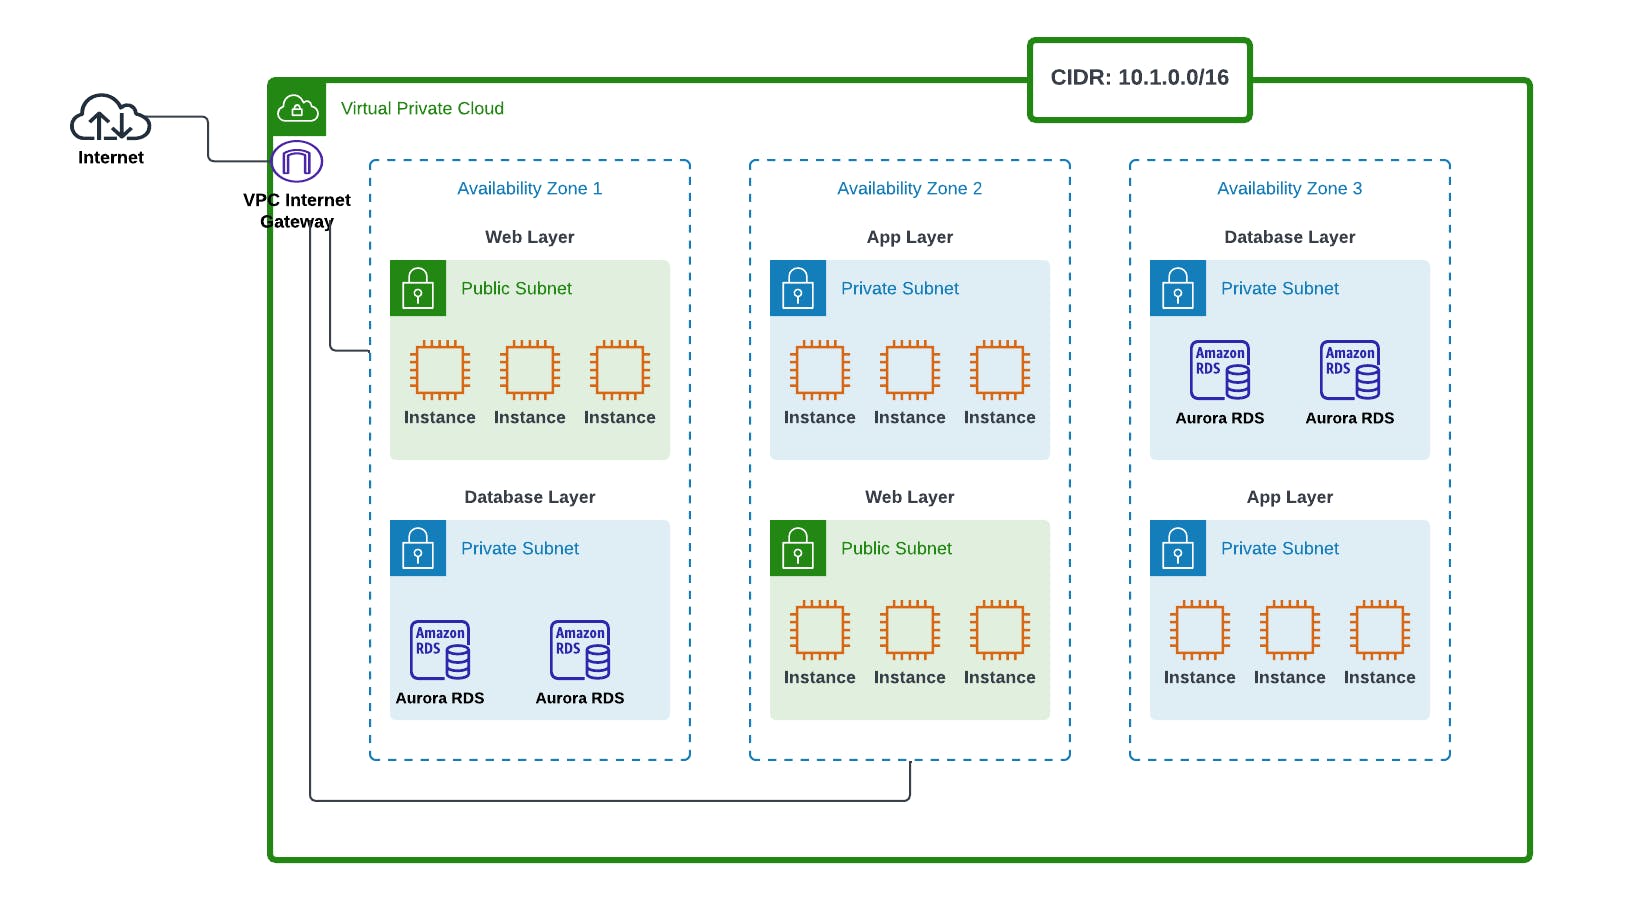
Okay let's check our architecture here. We've got 6 subnets, and we've distributed our resources across different Availability zones.
If say Availability Zone 1 failed, our application won't be affected, as we still have a backup web and application layer in Availability Zone 2, as well as a database layer in Availability Zone 3. That's how High Availability is achieved.
2. SECURITY GROUPS
Security Groups act as virtual firewalls for the instances. They set to protect the instances against unwanted traffic, etc.
Let's have a quick overview of security groups;
Security Groups protect the EC2 instance.
You can have many security groups associated with the same instance, or have many instances and ENIs associated with one security group.
All traffic from the instance (outbound) is allowed by default, but traffic from outside to the instance (inbound) is denied. So one has to write allow rules for inbound.
They are stateful.
One can only write allow rules, not deny rules.
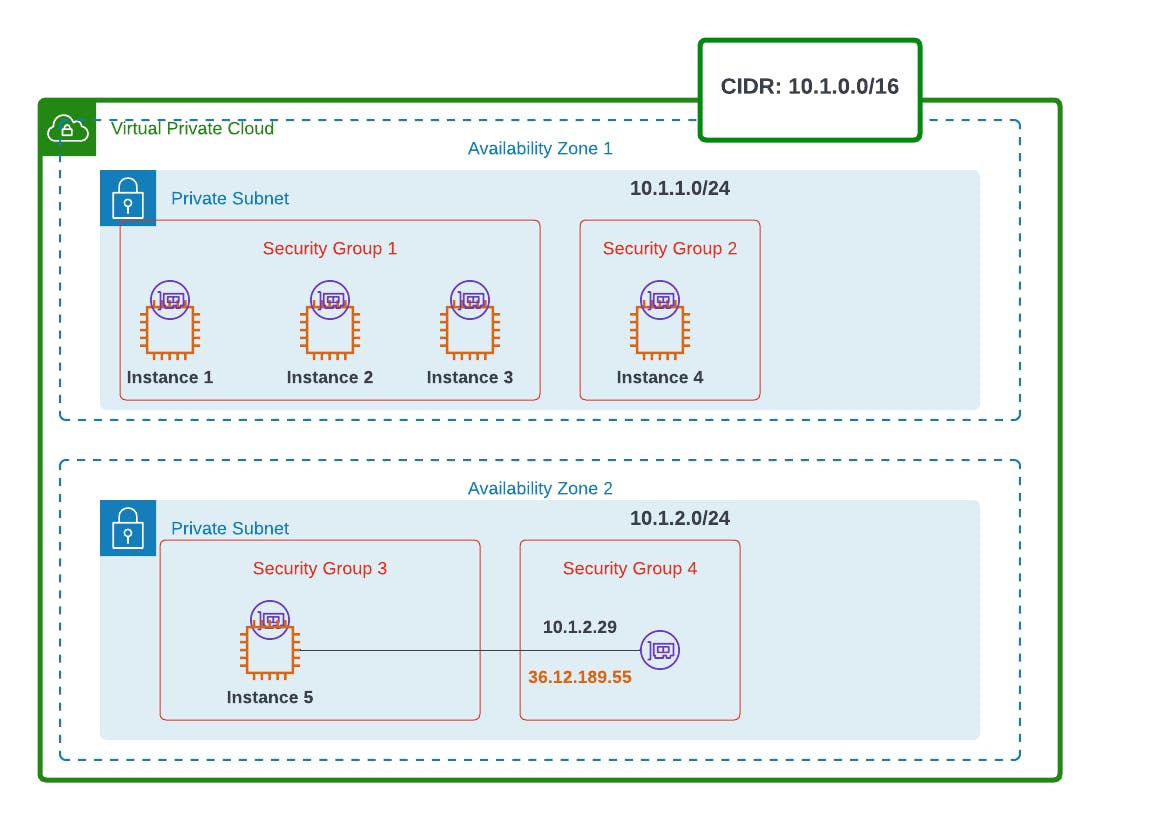
To understand these concepts, let's have an overview of this architecture.

Let's say we have a web application, with instances 1 - 3 acting as web servers, instance 4 as a security server, and 5 as our application server.
Our 3 web servers will be grouped into 1 security group. Our security server will have its group, with our app server having 2 distinct security groups, as one of its ENIs has an elastic IP for connecting to the internet.
Say instance 3 wants to communicate with instance 4. By default, all outbound traffic is allowed, so traffic out will happen (green arrow).
When traffic from instance 3 gets to 4, it will be denied entry (red arrow), if we haven't written any rules to security group 2.
To change that, we'll have to manually write rules for security group 2 to allow incoming traffic.
So now, instances 3 and 4 can communicate with each other.

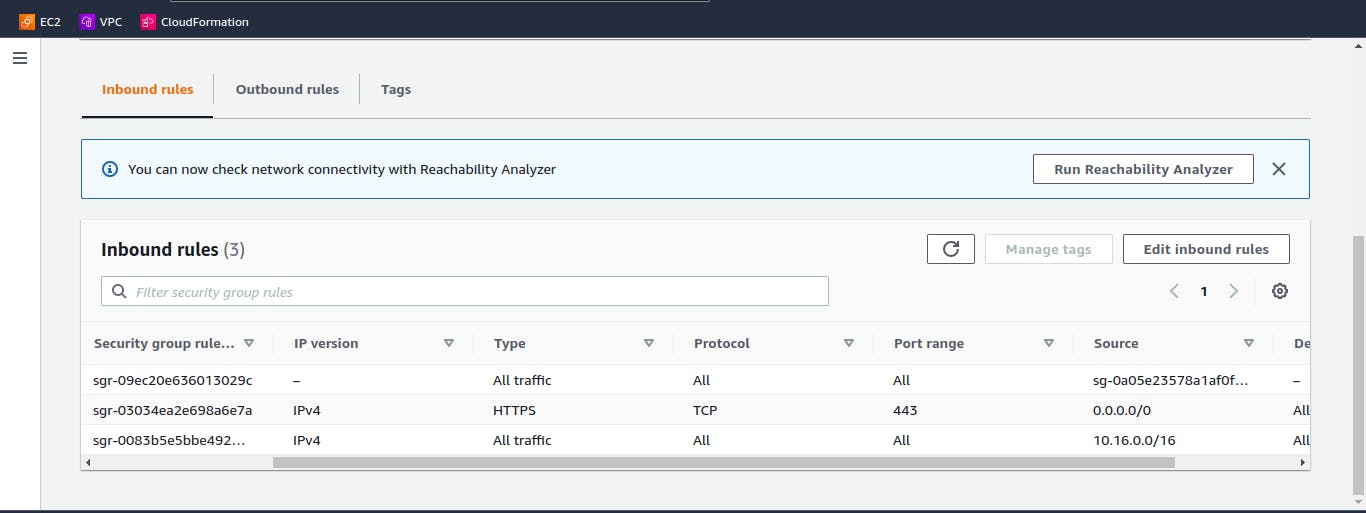
Here's what a Security Group looks like from the console;
3. Network Access Control Lists (NACLs)
Protect the subnet.
By default allows all traffic inbound/outbound.
Can write both allow and deny rules.
Are stateless.
Let's now analyze how security groups and NACLs work together.
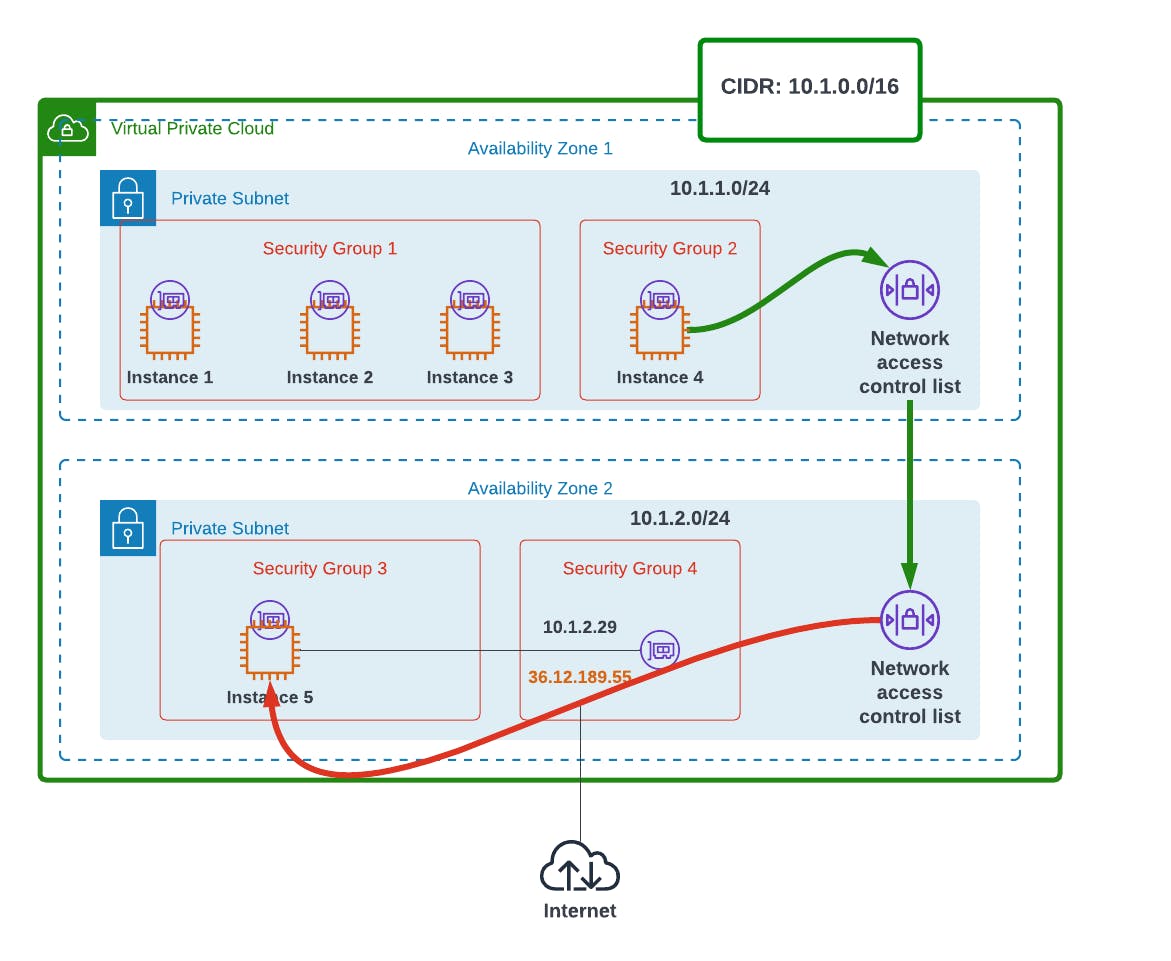
So our instance 4 wants to communicate with instance 5. Since they are in two different Availability Zones and Subnets;
The traffic will first go out of Security group 2, as by default all outbound traffic is allowed.
It will then pass through Availability Zone 1's NACL, for inspection. Remember, by default NACLs allow all traffic to pass through, so no hitch there.
The traffic will then reach the second NACL, for Availability Zone 2. It will also go through.
When it gets to Security Group 3, traffic gets denied (red arrow). Why? Let's say we had not written any allow rule in the Security group. By default all inbound traffic is denied, so it won't go through.
So that's how Security Groups and NACLs work together.
Therefore, as a solutions architect, when troubleshooting cases where instances are not communicating with each other, checking whether the Security Groups are properly configured would help in solving the issue.
4. Route Tables, Internet Gateways, NAT Gateways
a) Route Tables
Route tables are essential because they help subnets communicate with each other. They, therefore, direct traffic to their destination. They are like road signs directing one to reach their destination.
There's a main route table that automatically comes attached to the VPC, then there's a custom route table that you can also create for your VPC and add the desired routes.
Each subnet also has its own route table. Now remember, one subnet can have only one route table, but one route table can be associated with many subnets. To understand, picture this; A parent (route table) can have maany many children, but a child (subnet) can have only one parent.
To get an in-depth understanding of route tables here's the official AWS Documentation on route tables.
b) Internet Gateways
So you might have wondered, what makes a subnet public or private? The distinguishing factor is what we call the AWS Internet Gateway. A gate to the internet that's all. So subnets are basically private until when connected to the internet they become public.
But deploying the Internet Gateway won't automatically make the subnet public. One has to direct the subnet's traffic to it, using the subnet's route table.
Here's how it works;
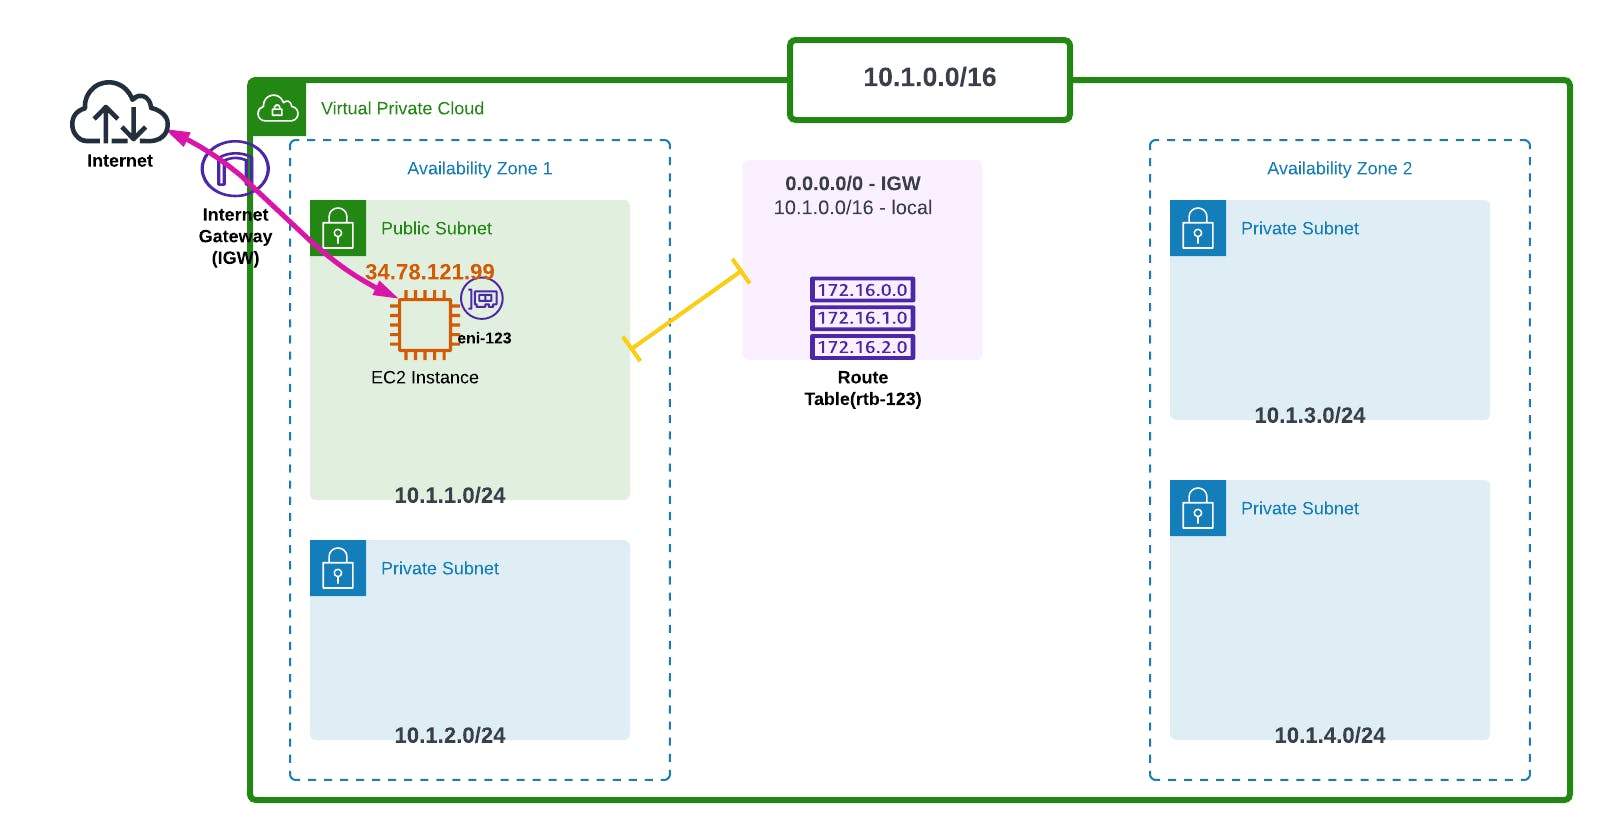
So we've deployed our Internet Gateway (IGW), and as shown in the Route Table above (rtb-123), we've directed our route to the Gateway (0.0.0.0/0 - IGW). What 0.0.0.0/0 basically means is that any IP address that is not known by the route table directs to the Internet Gateway.
There's also the public IP address given to that instance (34.78.121.99), technically known as an Elastic IP Address.
So that's how a public subnet connects to the internet. But what if we want our subnet to still remain private, but connect to the internet? That's where the AWS NAT (Network Address Translation) Gateway (NGW) comes in.
c) NAT Gateways
So a NAT Gateway is used when one wants their subnet to access the internet, but no external traffic can connect to the subnet. So the subnet remains private, but can still access the internet. This is mostly used as a security mechanism to avoid unwanted access to the subnet.
NAT Gateways are mostly used to download software, Operating System updates, etc.
So here's how a NAT Gateway is configured.
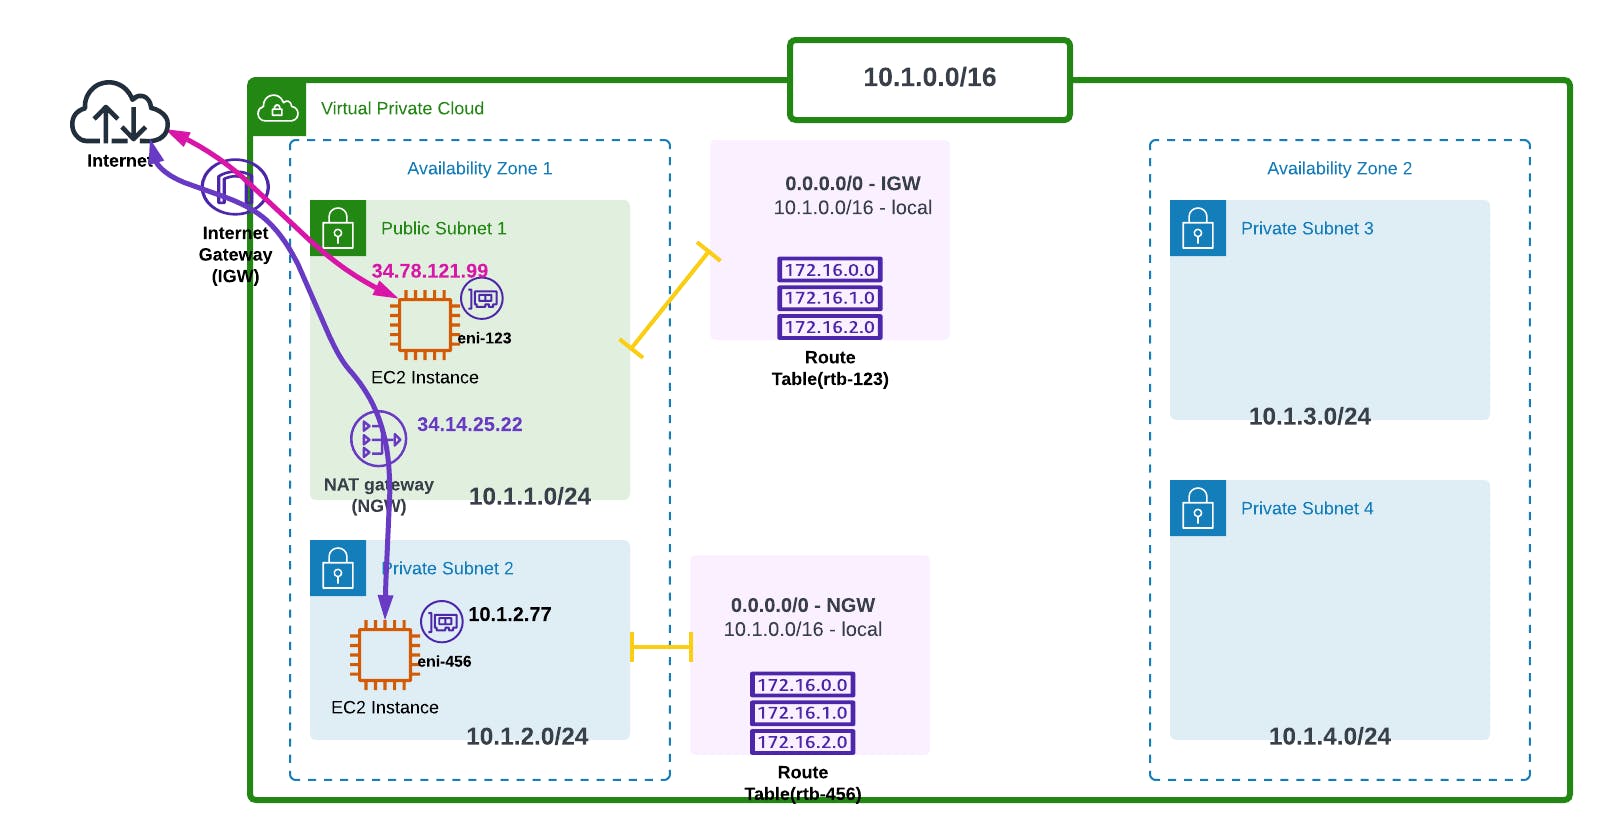
So the NAT Gateway(NGW) is normally deployed on the public subnet, then since it's a public NAT Gateway an elastic IP Address is also assigned to it (34.14.25.22).
So from the NAT Gateway to the internet the traffic uses a public IP Address, but inside the subnet the connection is private.
N.B! The number of Elastic IP Addresses assigned per account is 5, but that's a soft limit that can be adjusted upon request.
5. Elastic Network Interfaces (ENIs)
Last but not least, you may have noticed that in my instances I've attached some purple thingie and labelled it as eni-123, eni-456, that's what we call an Elastic Network Interface.
They are like Network Interface Cards, which are attached to an instance automatically so that it can gain access to the internet.
They are called Elastic because you can detach one ENI and attach it to another instance. Let's say one instance failed, you can detach its ENI and attach it to another running instance to maintain the same IP address.
One can assign multiple ENIs to an instance if it's a larger instance.
The IP address assigned to the ENI is gotten from the IP range of the subnet. For example, if the IP range of the subnet is 10.0.1.0/24, the ENI's IP address can be 10.0.1.55, or 10.0.1.123, yeah.
One can also have an Elastic IP attached to the ENI if they want their instance to be accessible via the internet, like our public subnet 1's Elastic IP (34.78.121.99).
Now during the configuration of route tables, other than the local route, one can direct a more specific route to a specific subnet. Here's what I mean.
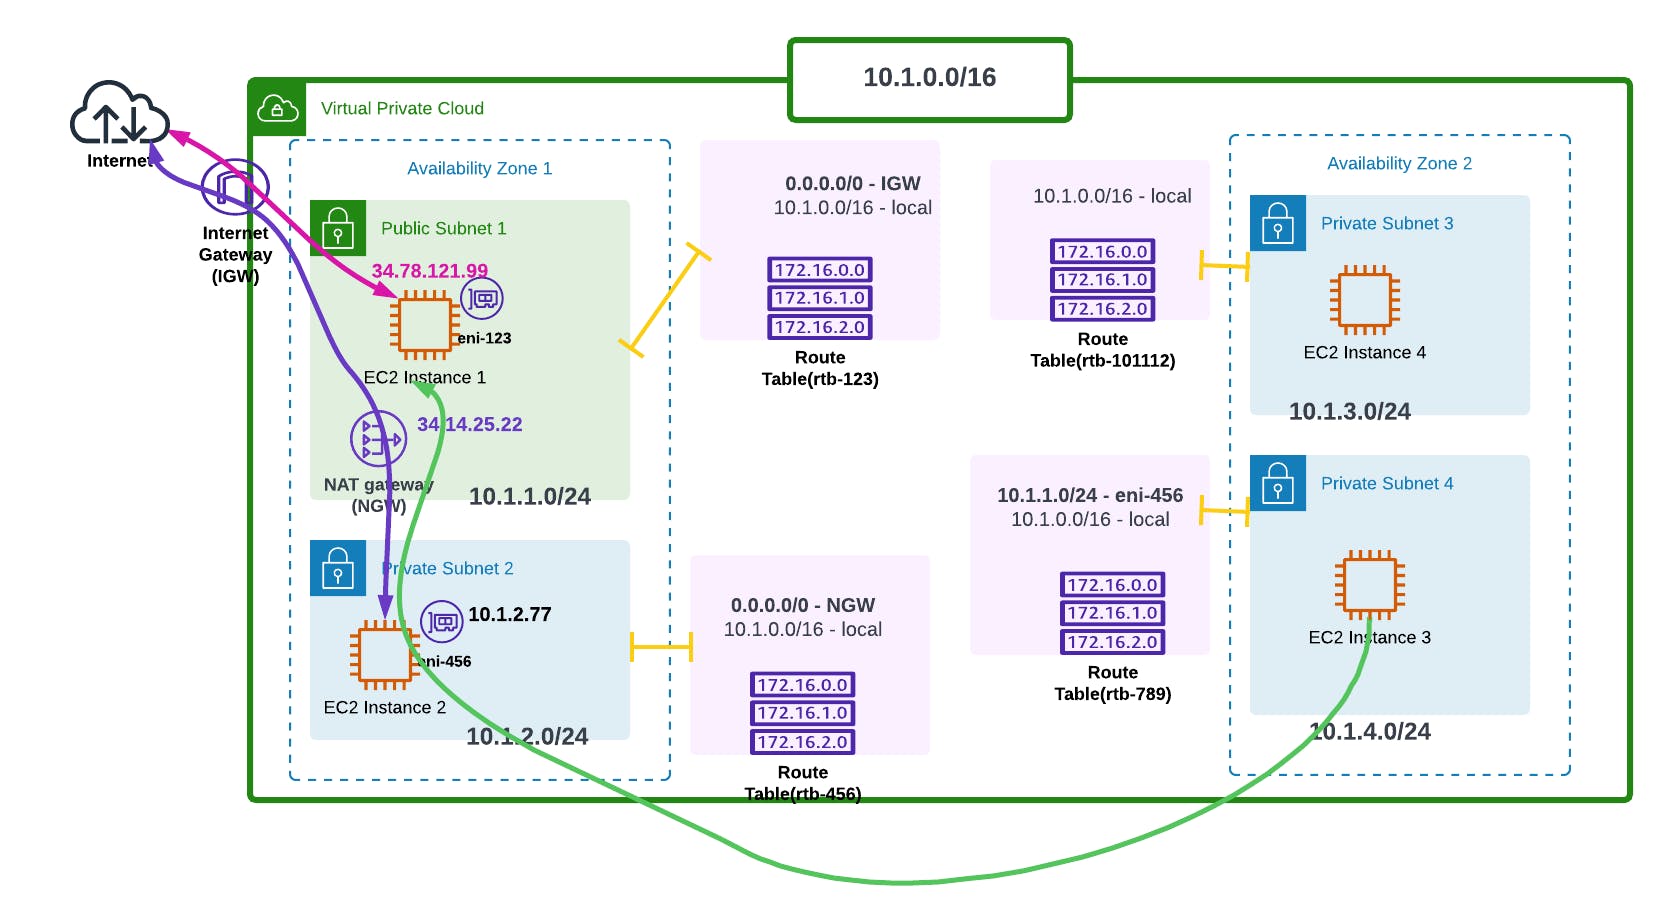
Now our instance 3 wants to communicate with instance 1, but through a specific hop which is our Elastic Network Interface, eni-456. Let's say our instance 2 is a security device, so it wants to go through it before reaching subnet 1.
In our subnet 4's route table (rtb-789), we'll therefore add a more specific route to it (10.1.1.0/24 - eni-456) to say hey!! Take me directly to subnet 1, but go through security first.
Okay!!! So that's basically some of the core concepts of the AWS Network Architecture. To get the full picture of how everything works, here's a simple architecture.
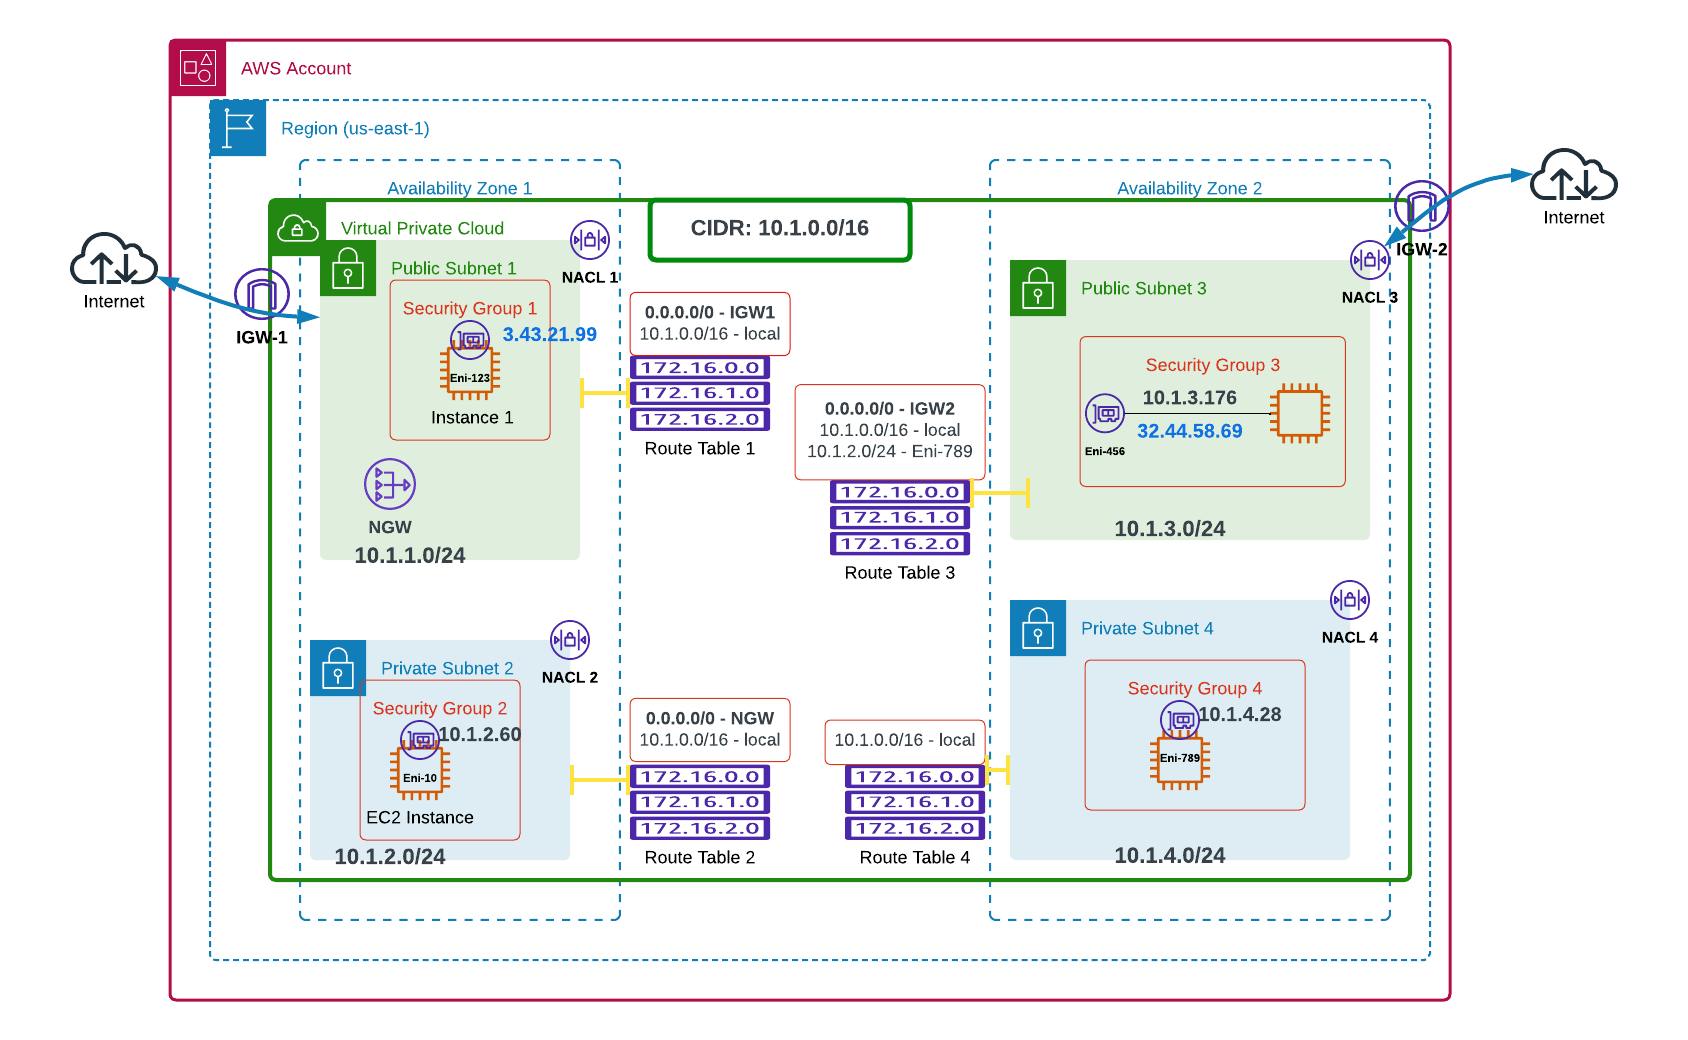
So we've got our 2 Availability Zones, 4 subnets, and therefore 4 NACLs, Security Groups, and Route Tables to configure and troubleshoot manually.
Now imagine an enterprise having 5 accounts, with 3 VPCs in each account, 3 AZs in each VPC, and 2 subnets in each Availability Zone! Imagine the headache of configuring all those connections!!!

Okay now that that's done, we'll now get back to our hands-on lab!!! I hope I didn't leave anyone behind!! Or bore you to death !!! See you soon 😚😚😚